BIFINETT KH 1133 BOUILLOIRE EN PLASTIQUE AVEC THERMOSTAT - Kettle KOMPERNASS - Free user manual and instructions
Find the device manual for free BIFINETT KH 1133 BOUILLOIRE EN PLASTIQUE AVEC THERMOSTAT KOMPERNASS in PDF.

| Brand | KOMPERNASS |
| Model | BIFINETT KH 1133 |
| Product type | Electric plastic kettle with thermostat |
| Capacity | 1.7 L |
| Power | 2500 – 3000 W |
| Voltage | 220 – 240 V ~ 50 Hz |
| Color | White / Plastic |
| Main features | Automatic shut-off, operation indicator light, push-button on/off, lockable lid, removable filter in the spout |
| Keep warm function | No |
| Adjustable thermostat | Yes, temperature adjustment dial |
| Base | 360° swivel base with electrical connector |
| Water level indicator | Yes, MIN and MAX markings |
| Housing material | Plastic |
| Base material | Plastic, metal base |
| Anti-scale filter | Removable filter in the spout |
| Cleaning | Exterior surface with damp cloth; descaling with food-safe product |
| Safety | Automatic shut-off in case of boiling or dry operation, overheating protection, thermal switch |
| Cable length | Approx. 0.7 m |
| Weight | Approx. 1 kg |
| Dimensions (L x W x H) | Approx. 22 x 15 x 24 cm |
| Spare parts | Filter, lid, base (on request) |
| Repairability | Parts available from customer service; do not open the housing |
| Warranty | 2 years |
Frequently Asked Questions - BIFINETT KH 1133 BOUILLOIRE EN PLASTIQUE AVEC THERMOSTAT KOMPERNASS
User questions about BIFINETT KH 1133 BOUILLOIRE EN PLASTIQUE AVEC THERMOSTAT KOMPERNASS
0 question about this device. Answer the ones you know or ask your own.
Ask a new question about this device
Download the instructions for your Kettle in PDF format for free! Find your manual BIFINETT KH 1133 BOUILLOIRE EN PLASTIQUE AVEC THERMOSTAT - KOMPERNASS and take your electronic device back in hand. On this page are published all the documents necessary for the use of your device. BIFINETT KH 1133 BOUILLOIRE EN PLASTIQUE AVEC THERMOSTAT by KOMPERNASS.
USER MANUAL BIFINETT KH 1133 BOUILLOIRE EN PLASTIQUE AVEC THERMOSTAT KOMPERNASS
1.7 I Electric Water Kettle
Bifinett KH 1133
1. Intended Use
This device is intended for heating water for household use. It is not intended for use with other liquids or in commercial or industrial environments.
2. Technical Data
Voltage 220~240V/50Hz
Power consumption .. 2500 ~ 3000 W max.
Note: In older building installations, the building fuse (12A) may be triggered by the high power consumption.
Important Instructions for Your Safety!
To avoid life-threatening electric shocks:
- Make certain that the base with the electrical connections never comes into contact with water! Let the base dry completely before using, should it ever accidentally become wet.
- Make certain that the power cord never becomes wet or damp during operation. Lay the cord such that it cannot be pinched or otherwise damaged. Should the power cord or the power plug ever become damaged, have them replaced by customer service before continuing to use the device.
Always pull the plug out of the power socket after use. Switching off the device is not sufficient because the device receives power as long as the power plug is connected to the socket.
To prevent the risk of fire or injury:
- Only heat water while the lid is closed, otherwise the automatic cut-out does not function. Boiling water can then spray out over the edge.
- Hot steam may escape, and the kettle is also very hot during operation. It is always best to wear oven mitts when handling the kettle.
- Make certain that the device rests firmly and vertically before switching it on. Boiling water can cause an unstable kettle to fall over.
- Never leave a heat-generating device unattended! Never let children or frail persons operate the device unsupervised because they may not always properly appreciate the possible dangers.
3. Starting Up the Device
Before starting up the device, make certain that ...
- the device, power plug and power cord are in perfect condition and ...
- all packaging materials have been removed from the device.
Fill the device with water up to the MAX mark and let the water come to a full boil as described in the next section. Pour this water away.
4. Boiling Water
Danger: Never place the electrical base near water - life-threatening danger!
You should only heat as much water as you need directly. This saves energy, water and time:
- Remove the kettle from the base before filling it!
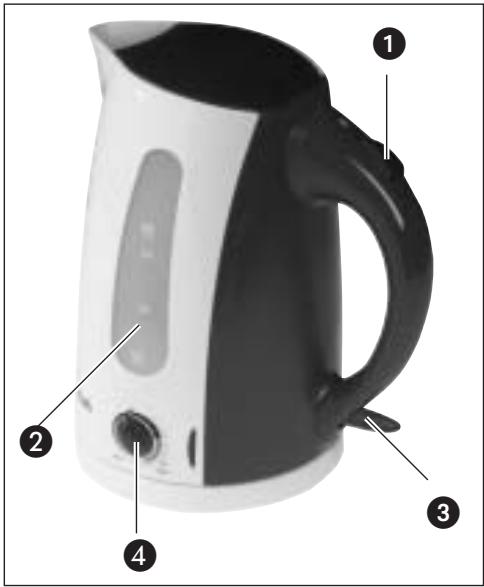
Press down on the lid handle to unlock it. The lid then springs open.
Hold the kettle vertical while filling it. Only then will the level indicator on the side correctly indicate the amount of water. Fill the kettle... - to at least the MIN mark so that the device does not overheat,
- no higher than the MAX mark so that no boiling water spills out.
- First close the lid...
-
Then place the kettle on the base until it stands up straight.
4 Set the desired water temperature with the temperature controller. The temperature controller must be set to the MAX setting to bring the water to a boil. -
Now insert the power plug into the power socket ...
3 and press down the switch until it snaps into the depressed position.
A red light indicates that the device is now heating up. - The device switches itself off once the water is at a full boil. The switch then snaps back out and the red light goes out.
3 To interrupt the heating, slide the switch back to the up position. This also causes the red light to go out.
Warning: Pull the power plug out of the power socket before removing the kettle from the base. This prevents any water spilling out from falling on the electrical connections in the base, which could cause a short-circuit.
5. Cleaning and Care
Danger: Never open any of the device parts. No operating elements are located inside the device. An open housing can create the risk of a life-threatening electrical shock.
Never submerse any parts of the device in water or other liquids! This can create the risk of a life-threatening electrical shock if residual liquid comes into contact with powered components.
Before cleaning the device, ....
- First pull the power plug out of the power socket and let the device cool completely.
- Clean the exterior surfaces and the power cord with a slightly damp cloth. Always dry the device well before using it again.
- Never use any cleansers, abrasive substances or solvents. These could damage the device.
In the event of calcium deposits:
Purchase a decalcifying agent suitable for use with food containers from a household goods stores (e.g. coffee machine decalcifier).
- You can use a suitable product from a specialised dealer for the stainless steel container bottom.
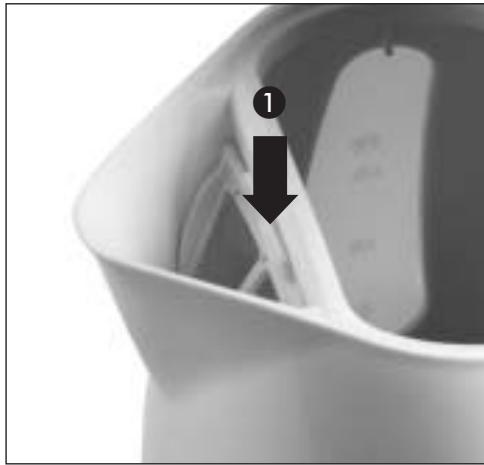
Removing / Replacing the Spout Screen:
- Open the lid completely.
Press down on the side of the spout screen to remove it toward the inside.
After cleaning, insert the screen from above and press it firmly into place.
6. Storage
Let the device cool completely before storing it.
- Wind the power cord around the holder on the bottom of the device.
- Store the device in a dry place.
7. Disposal
Tip: Care for the environment. If you wish to dispose of the device, dispose of it at a collection site for recycling of electronics.
Danger: You can avoid the risk of accidents caused by playing children by making the device inoperable by removing the power plug before disposing of the device.